The application of high-density polyethylene (HDPE) pipelines is becoming increasingly
widespread. Currently, this product is widely used in the fields of gas, natural gas, and water
supply. Zibo Dingchang Xinlong Plastic Technology Co., Ltd. has accumulated substantial
practical construction experience through years of production and service.
HDPE pipelines are characterized by easy construction, fast installation, corrosion resistance,
non-pollution, and long service life. There are two main methods for connecting HDPE pipes:
butt fusion and electrofusion.

At present, the main pipelines primarily use butt fusion. The principle of butt fusion is to heat
the matching surfaces of two HDPE pipes against a heating tool until their flat ends melt.
After removing the heating tool, the two molten ends are pressed together and held under
pressure until the joint cools, forming a unified structure. Workers need to undergo skills
training before construction, possess professional skills certificates, and strictly follow
welding procedures during the construction process. Zibo Dingchang Xinlong Plastic
Technology Co., Ltd. can provide welding technical services.
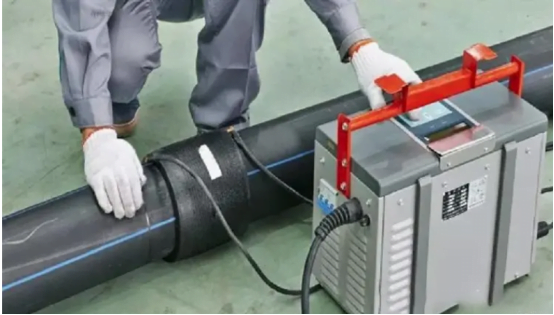
Currently, steel mesh skeleton pipelines mainly use electrofusion connections. The principle
of electrofusion is to insert the ends of two pipes into an electrofusion fitting, heat them with
an electrofusion machine until the interior melts, press the molten pipe surfaces and fittingsurfaces together, and hold them until the joint cools, forming a unified structure. Workers
need to undergo skills training before construction, possess professional skills certificates,
and strictly follow welding procedures during the construction process. Zibo Dingchang
Xinlong Plastic Technology Co., Ltd. can provide welding technical services.

Welding Preparation
Butt Fusion Welding Preparation Steps:
1. Install Clamps:
- Load the clamps that match the pipe specifications into the machine frame.
2. Prepare Supports:
- Prepare sufficient supports to ensure that the pipes to be welded are at the
same height as the centerline of the machine frame and can be easily moved.
3. Set Heating Plate Temperature:
- Set the heating plate temperature to 200-230°C (392-446°F).
4. Power Up:
- Connect the welding machine to the power supply, turn on the heating plate,
milling cutter, and oil pump switches, and perform a test run.
Welding ProcessWelding Procedure:
1. Preparation:
- Check the pipes and clean the pipe ends.
- Secure the pipes in the clamps.
2. Milling:
- Mill the pipe ends with the milling cutter.
- Check the alignment and gap of the pipe ends.
3. Heating:
- Heat the pipe ends and observe the minimum bead height.
4. Fusion:
- Join the pipes and cool for the specified time.
- Remove the welded pipes.
During the welding process, operators should follow the parameters on the welding procedure
card and make adjustments based on weather and ambient temperature changes as necessary.
Detailed Welding Steps:
1. Verify Specifications:
- Confirm that the pipe specifications and pressure ratings are correct.
- Inspect the pipe surfaces for dents, impacts, or scratches. If any scratches
exceed 10% of the pipe wall thickness, perform localized removal before use.
2. Clean Pipe Ends:
- Use soft paper or cloth soaked in alcohol to remove oil or foreign substances
from both pipe ends.
3. Position Pipes:
- Place the pipes to be welded in the machine frame clamps, ensuring the
protruding lengths at both ends are similar (as short as possible without
affecting milling and heating, ideally 20-30 mm).
- Support the sections of the pipes outside the frame to align the pipe axis with
the frame centerline, then tighten the clamps.
4. Milling:
- Insert the milling cutter and turn on its power switch.
- Close the pipe ends together with appropriate pressure until continuousshavings appear on both ends (shaving thickness should be 0.5-10 mm,
adjustable by the milling cutter blade height).
- Remove the pressure, wait a moment, then retract the movable frame and turn
off the milling cutter.
5. Check Alignment:
- Remove the milling cutter and close the pipe ends.
- Inspect the alignment (misalignment should not exceed 10% of the pipe wall
thickness, adjust pipe straightness and clamp tightness as needed).
- Ensure the gap between pipe ends does not exceed 0.3 mm (for pipes under
225 mm), 0.5 mm (for pipes 225-400 mm), or 1 mm (for pipes over 400 mm).
If not satisfactory, re-mill until requirements are met.
6. Heating and Fusion:
- Once the heating plate reaches the set temperature, place it in the frame and
apply the specified pressure until the minimum bead height is reached.
- Reduce the pressure to the specified value (just maintaining contact between
the pipe ends and the heating plate for heat absorption).
- After the absorption time, release the movable frame, quickly remove the
heating plate, and join the pipe ends, minimizing the switch time.
- Cool the joint to the specified time, release the pressure, loosen the clamps,
and remove the welded pipes.

Welding Process Parameters
The key parameters directly related to the welding process are temperature, time, and
pressure. The welding process curve illustrates the relationship between pressure and time
during welding.
● Pa1: Heating pressure
● Pa2: Heat soak pressure
● Pf1: Fusion pressure
● Pf2: Cooling pressure
● Ta1: Heating time
● Tu: Switching time (including the time to remove the heating plate)
● Tf1: Pressure increase time
● Tf2: Cooling time
Welding Inspection
Practical experience has shown that the most vulnerable parts of polyethylene pipelines are
the joints, which are prone to damage and leaks. The success of a project hinges on thequality of these connections. Therefore, strict joint quality inspection is crucial for
underground pipeline projects. Destructive testing of polyethylene pipeline joints is necessary
to check internal quality.
1. Post-Welding Inspection:
- Strengthen self-inspection and third-party acceptance after welding.
- Randomly cut a proportion of joints for internal inspection.
2. Data Recording:
- Check all welding data records from the welding machine for each joint.
3. Visual Inspection:
- Conduct 100% visual inspection.
- Supervision units should randomly inspect a proportion of welds based on
construction quality, no less than 10% of total welds, with at least five welds
per welder.
4. Destructive Testing:
- Perform destructive tests on joints for each project. For butt fusion joints,
sample 3% of welds, with a minimum of one. Cut the weld into four strips to
check for internal fusion quality. Incomplete fusion is considered a failure.
- Alternatively, conduct tensile tests to ensure tensile strength meets design and
specification requirements.
- If any weld fails, double the inspection rate for that welder’s joints. If further
failures are found, rework all joints welded by that welder.
Common Issues and Prevention in PE Pipe Butt Fusion Welding
With the expansion of the pipeline network and the extension of PE pipelines, the shortage of
skilled welding technicians has become apparent. Here are common issues and preventive
measures for PE pipe butt fusion welding:
1. Pipe Alignment:
- Common Issue: Misalignment of pipe ends exceeding 10%.
- Preventive Measure: Welders must be diligent, repeatedly adjusting the
alignment until no visible misalignment is detected by sight or touch.
2. Pipe End Milling:
- Common Issue: Uneven milling, resulting in concave or convex surfaces.
- Preventive Measure: Ensure continuous shavings during milling and do not
stop and restart the milling cutter on the pipe ends. Inspect the milled surface
for any irregularities and re-mill if necessary. Align and check pipe ends for
acceptable misalignment and gap before proceeding.
3. Welding Pressure, Heating, and Heat Soak:
- Common Issue: Incorrect welding pressure, excessive or insufficient heating
time, leading to poor fusion.
- Preventive Measure: Calculate the appropriate welding pressure,
temperature, and heat soak time before construction. Welding pressure
generally includes drag pressure plus specified pressure. Determine drag
pressure before welding. Calculate specified pressure (MPa) as pipe
cross-sectional area (mm²) × 0.15 / cylinder area (mm²). Adjust heating and
heat soak time based on pipe diameter. Visually check bead height during
heating and reduce pressure to drag pressure during the heat soak phase. The
heat soak time is typically pipe wall thickness (mm) × 10 (seconds).
4. Cooling:
- Common Issue: Insufficient cooling time, often shortened to meet deadlines,
which can cause latent quality issues.
- Cooling Time Requirement: Calculate cooling time as 1 minute per 1 mm ofexternal force
pipe wall thickness. Maintain pressure during cooling and avoid applying any
avoid applying any external force.

Precautions for Clients Before Construction
1. Determine Water Pipe Routing:
- Clients should decide on the water pipe routing based on the renovation design
drawings and the structure of the house. Pipe routing options include ceiling
arrangement, wall groove arrangement, floor arrangement, and exposed pipe
installation. Choose the routing method in consultation with the renovation
team.
2. Positioning of Water Equipment:
- Position water equipment such as pre-filters, booster pumps, or wall-mounted
faucets before installing water pipes. Ensure the placement is confirmed to
avoid impacting the construction process.
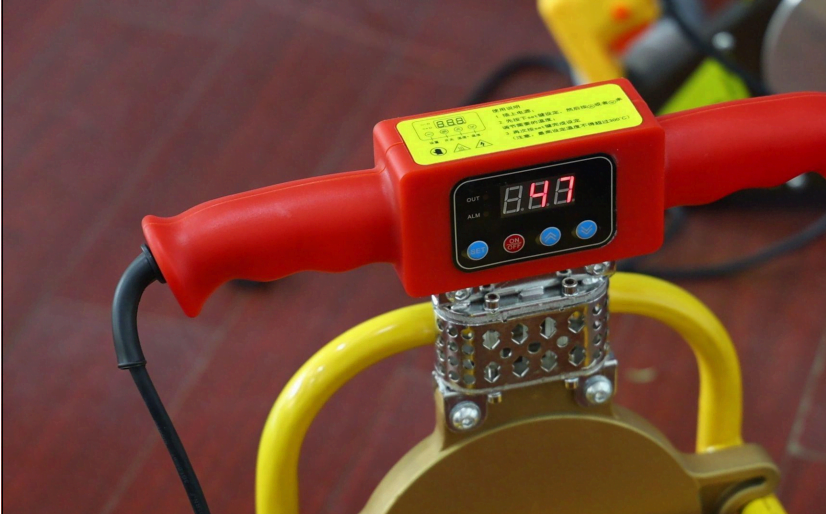
3. Heating Machine Usage:
- Use heat fusion machines from reputable manufacturers, which typically have
red and green indicator lights or a temperature display. The red light indicates
heating, and the green light indicates maintaining temperature. Do not use the
machine the first time it reaches the green light; use it only after it reaches the
green light a second time. The fusion temperature should be between 200°C
(392°F) and 220°C (428°F). Temperatures outside this range can prevent
proper fusion and create leak risks.4. Inspect Pipe Ends:
- Check both ends of each pipe for damage before construction to prevent issues
caused by transportation. If damage is found or suspected, trim 4-5 cm from
the pipe end. Avoid hitting the pipes with hammers or heavy objects to prevent
cracking, which can extend their lifespan.
5. Pipe Cutting:
- Cut pipes so that the end face is perpendicular to the pipe axis. Use a
specialized pipe cutter for cutting.
6. Heating:
- Without rotating, insert the pipe end into the heating die head to the marked
depth. Simultaneously, push the pipe fitting onto the heating die head without
rotating, reaching the specified mark. Follow the heating time indicated in the
instruction manual.
7. Fusion Process:
- After the heating time is reached, immediately remove the pipe and fitting
from the heating molds. Quickly and evenly insert them straight into the
fusion depth without rotating, forming a uniform flange at the joint. Control
any rebound after insertion.
8. Adjusting Joints:
- Within the specified processing time, the newly fused joint can be slightly
adjusted or rotated. However, after the processing time has elapsed, do not
forcibly adjust the joint. Ensure that the connected pipes and fittings are
straight to avoid issues with faucet installation.
9. Cooling Time:
- During the specified cooling time, do not apply any external force to the newly
fused joints.
Installation Precautions:
1. Using PE Socket Fittings with Metal Threads:
- Ensure the white PTFE tape is securely sealed around the threads to prevent
leaks.
- Avoid overtightening the PE socket fittings with metal threads to prevent
cracking and subsequent leaks. Apply force moderately.2. Installing Wall, Ceiling, and Floor Pipelines:
Floor Pipelines:
1. Ensure the pipelines are installed straight and level, with the outlets
perpendicular to the wall.
2. After installation, protect the pipelines. Cover pipelines running on the
ground with a mix of cement and yellow sand to prevent direct foot
traffic or heavy pressure.
3. Protection from Sunlight:
- Pipes and fittings exposed to direct sunlight or UV radiation without any
protection will have their polyethylene molecular structure compromised,
reducing their lifespan. Use a UV-resistant foam sleeve (insulation cover) on
the pipelines to prevent damage.

Pipeline Inspection and Acceptance:
1. Pressure Testing:
- Use a pressure gauge with an accuracy of 0.1 Pa. It is preferable to install the
gauge at the lowest point of the entire pipeline system.
- After filling the pipeline with water and expelling the air, close the main valve
at the water meter to begin the test.
- The test pressure should be 1.5 times the maximum possible working pressure
(typically 8-10 kg water pressure). The standard pressure retention time for PE
water pipes is 12 hours. If the pressure gauge needle drops by 0.5 kg within
this time without any leaks at the end caps, it is within the normal range due to
pipeline expansion from internal pressure. However, the entire pipeline system
must be checked for assurance.2. Note: Do not use an electric pump for pressure increase.
3. Causes of Leaks at Fusion Points During Pipeline System Use:
- Temperature Issues: The temperature of the heat fusion machine may be too
high or too low, or the heating time may be inaccurately controlled.
- Equipment Condition: The molds might be severely worn out, aged, or the
fusion surface may not be smooth. The coating on the heating plate might be
missing.
- Contamination: The fusion points may have water, oil, or other impurities,
preventing proper fusion.
- Operator Error: Technicians may not be properly trained, leading to
incorrect operation.
- External Damage: Human factors during construction, such as heavy objects
falling on the pipes or nails puncturing them.
- Material Incompatibility: Pipes and fittings from different brands or
different raw materials may not fuse properly. Zibo Dingchang Xinlong Plastic
Technology Co., Ltd. provides one-stop service to avoid such issues.

